
Configuring Ansible Tower/AWX with RedHat SSO / Keycloak
Configuring Ansible Tower to use RedHat Single Sign on
Keycloak is the upstream project for RedHat SSO. When troubleshooting look at keycloak documentation as well
Ansible AWX is the opensource free version of RedHat’s Ansible Tower.
STEP 1: Create Key, Certificate, and Key Store
Follow these steps to create the key, certificate and key store to enable Ansible Tower SSO integration.
- If you do not possess an x509 cert, enter the following to create one:
openssl req -new -x509 -days 365 -nodes -out saml.crt -keyout saml.key
- Save saml.key in a notepad
- Save saml.crt in a notepad
- Log in to the RedHat SSO GUI as an admin
- Navigate to your realm -> Keys -> Providers, then click Add keystore as shown below

- Select RSA from the dropdown
- Complete the fields as shown below. (Upload your saml.key and smal.crt)
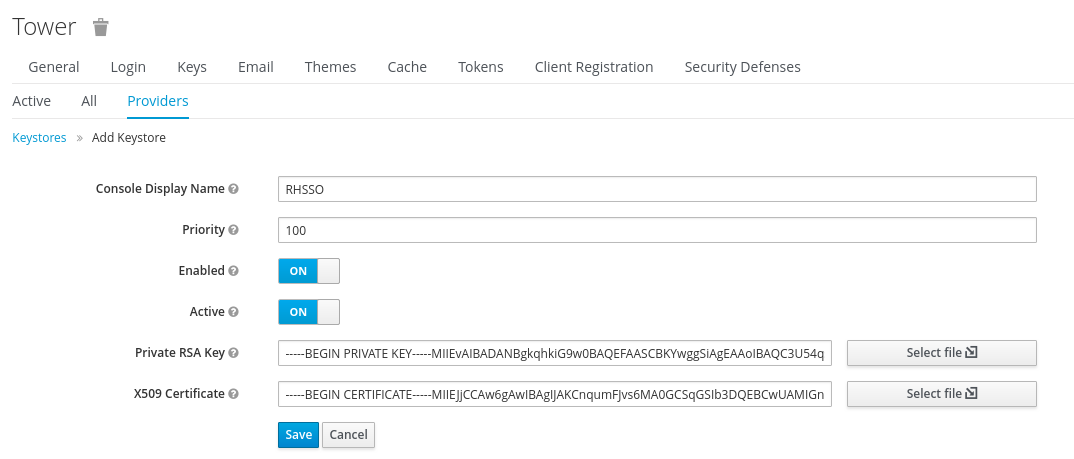
- Click Save
STEP 2: Configure Ansible Tower for SAML (SSO) Authentication
Follow these steps to configure Ansible Tower for Security Assertion Markup Language (SAML) single sign-on (SSO) authentication.
- Log in as the admin user on Ansible Tower and go to Settings > Configure Tower > Authentication > SAML
- Complete the fields as shown. NOTE: Some cannot be edited.
- SAML ASSERTION CONSUMER SERVICE (ACS) URL: Cannot edit
- SAML SERVICE PROVIDER METADATA URL: Cannot edit; used to obtain tower’s SAML metadata using curl.
- SAML SERVICE PROVIDER ENTITY ID: Enter the URL of the server. Note: Must match Client ID on SSO server.
- SAML PROVIDER PUBLIC CERTIFICATE: Paste the saml.crt
- SAML SERVICE PROVIDER PRIVATE KEY: Paste the saml.key
- SAML SERVICE PROVIDER ORGANIZATION INFO:
{
 "en-US": {
  "url": "<URL OF TOWER SERVER>:<PORT IF NEEDED>",
  "displayname": "RHSSO",
  "name": "RHSSO"
 }
}
- SAML SERVICE PROVIDER TECHNICAL CONTACT:
{
 "givenName": "<YOUR NAME>",
 "emailAddress": "<YOUR EMAIL>"
}
- SAML SERVICE PROVIDER SUPPORT CONTACT:
{
 "givenName": "<YOUR NAME>",
 "emailAddress": "<YOUR EMAIL>"
}
- SAML ENABLED IDENTITY PROVIDERS:
{
 "RHSSO": {
  "attr_last_name": "last_name",
  "attr_username": "username",
  "entity_id": "<SSO SERVER URL>:<PORT IF NEEDED>/auth/realms/YOUR REALM",
  "attr_user_permanent_id": "name_id",
  "url": "<SSO SERVER URL>:<PORT IF NEEDED>/auth/realms/YOUR REALM/protocol/saml",
  "attr_email": "email",
  "x509cert":  “ <PASTE THE X509 PUBLIC CERT HERE IN ONE, NON-BREAKING LINE>"
  "attr_first_name": "first_name"
 }
}
Note: The x509cert can be found by logging in to the SSO server and navigating to your realm’s realm settings -> keys -> and clicking Certificate under Public keys for the key store you created earlier.
- Click Save
Step 3: Create the Tower Client in RedHat SSO
Complete the following steps to create the Tower Client in SSO.
- In SSO, click on your realm -> Clients -> Create
- Choose Select File
- SSH into the tower server, or from a CLI that can curl the tower server, and run the following command:
curl -L -k https://<YOUR TOWER URL>/sso/metadata/saml/
- Save the output into tower_saml.xml
- Upload the tower_saml.xml
Note: Ensure the client ID matches SAML Service Provider Entity ID from the Tower SAML page earlier. They both should be the URL of the tower server: https://tower.example.org
- In the Client Protocol box, select SAML
- Click Save
- Apply the following settings:
Client ID: URL of Tower Server
Enabled: ON
Consent Required: OFF
Client Protocol: SAML
Include AuthnStatement: ON
Include OneTimeUseCondition: OFF
Sign Documents: ON
Optmize REDIRECT signing key lookup: OFF
Sign Assertations: ON
Signature Algo: PICK
SAML SIGNATURE KEY NAME: PICK
Canonicalization Method: Exclusive
Encrypt Assertations: OFF
Client Signature required: OFF
Force POST Binding: ON
Force Channel Logout: ON
Force NAme ID Format: OFF
Name ID Format: username
Root URL: URL OF TOWER SERVER
Valid Redirect URIs: URL of TOWER SERVER/sso/complete/saml
IDP Initiated SSO URL NAME: URL  OF TOWER SERVER
- Click Save
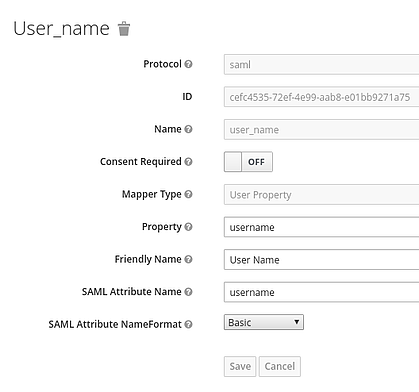
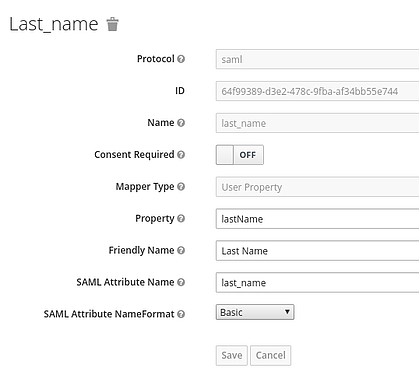
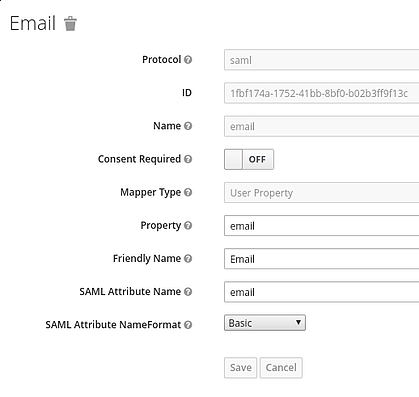
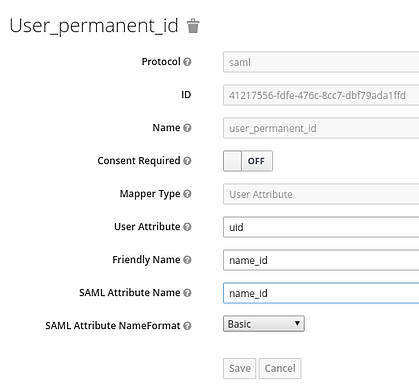
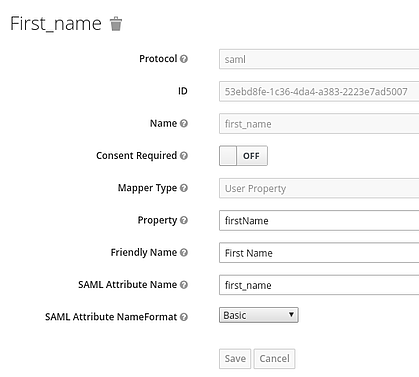
Step 4: Configure Mappers
Complete the following steps to create and configure mappers on Ansible Tower’s RHSSO client:
- In the tower client settings, select Mappers tab
- Click Create and add the 5 mappers show in the following figures
Note: firstName and lastName are case sensitive
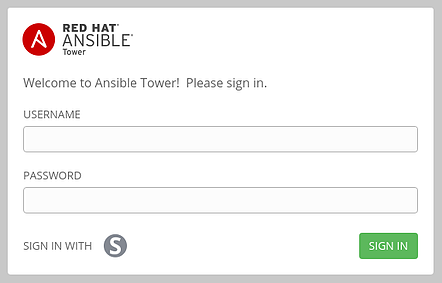
If done properly, the log-in screen for tower should show “SIGN IN WITH” and an S symbol, as shown in the figure below. This will redirect you to SSO sign-in.
Troubleshooting
If you run into issues during the configuration check here first.
Logs for SSO are found on the SSO server at:
/opt/rh/rh-sso7/root/usr/share/keycloak/standalone/log/server.log
Error: When uploading .xml metadata files:

Fix: Check the log in the above location. There is likely a syntax error in the .xml file.
Error: “Found an Attribute element with duplicated Name” when attempting to log in with SSO.
Fix: Navigate to (Your realm) -> Client Scopes -> role_list (saml) -> Mappers tab -> role list, then turn on Single Role Attribute.
Error: “Signature validation failed” when logging in to tower with SSO.
Fix: Check whether the x509cert is correct in Ansible Tower’s SAML settings under SAML ENABLED IDENTITY PROVIDERS. After ensuring the x509cert is valid, enter it on one line without spaces.
Error: “Invalid Signature” when trying to log in with SSO.
Fix: Turn off Client Signature Required under the Tower client settings tab in SSO.
Error: “Sign in with SSO” option not showing up on Tower log-in screen.
Fix: You must complete the SAML ENABLED IDENTITY PROVIDERS section of the tower SAML setup page for this to appear.