
RedHat Lessons Learned
RedHat Products Lessons Learned
Table Of Contents
Single Sign ON
Create Initial Admin User using CLI
- Navigate to keycloak-add-user script:
/opt/rh/rh-sso7/root/usr/share/keycloak/standalone/configuration/keycloak-add-user.sh
- Run:
./add-user-keycloak.sh -r master -u <"username"> -p <"password">
Access Management Console at port 9990
- /opt/rh/rh-sso7/root/usr/share/keycloak/bin/add-user.sh
- follow the prompts choosing (a) for management user, this adds the user to /opt/rh/rh-sso7/root/usr/share/keycloak/standalone/configuration/mgmt-users.properties
- Ensure you run standalone.sh using -bmanagement 0.0.0.0 in the command.
SSO Log Location
- /opt/rh/rh-sso7/root/usr/share/keycloak/standalone/log/server.log
- Reboot server
Satellite
Setting Up OpenSCAP Scanning With Ansible In Satellite
Pre-Requisites
The following are required for Ansible to successfully run its roles on the remote host:
•	Port 9090 on the satellite server is required to be open.
•	Port 9090 on the AWS EC2 Security group for the satellite is required to be open.
•	The satellite server must be able to SSH to the host system, so traffic sourced from satellite on port 22 must be whitelisted to the host system.
•	The host system must be registered to the satellite server.
•	The host system must have the correct subscriptions to install the required packages for the foreman and openscap client
- Port 9090 open on the firewall/securitygroup/satellite-server
- Edit Administer » System » Remote Execution to match the environments users, passwords, and sudo passwords for running the job.
- Copy the foreman SSH key from Satellite to each client using the ssh-copy-id command, OR any other method you wish.
- Upload the scap content on the satellite server. (Will be taken from the scap content RPM installed.)
foreman-rake foreman_openscap:bulk_upload:default
- Import the default Ansible Roles Satellite Web UI » Configure » Ansible » Roles » Import Ansible Roles » Select the roles » Update
- Import Ansible Variables Satellite Web UI » Configure » Ansible » Variables » Import Ansible Variables from Satellite » Select all the Variables » Update
- Make a SCAP policy with mark ansible as deployment options. Satellite Web UI » Host » Policy » New policy » Select Ansible as deployment options.
- Assign the policy to the client system. Satellite Web UI » Hosts » Select the host(s) » Select Action (drop down list) » Assign compliance policy » Select the policy.
- Assign ansible roles to the client system. Satellite Web UI » Hosts » click on edit of the host. » Ansible roles » select the ansible role.
- Run the Ansible Role to Configure the Scap Client on the Host Select the host » Schedule Remote Job » Run Ansible Roles. Once it passes, select Schedule Remote Job » Run OpenSCAP scan.
IDM
List Users
- kinit admin
- ipa user-find –all ( or single user)
Openshift
Find "Exited" containers and restart
| docker ps -a | grep Exited | awk ‘{print $1}’ | xargs -L1 docker restart |
Restart Master Services
- /usr/local/bin/master-restart api
- /usr/local/bin/master-restart controller
Ansible Tower
Configure Project Runs from GitLab
Configuring Ansible Tower to clone repos from a private GitLab server.
In Ansible Tower Settings -> Credentials
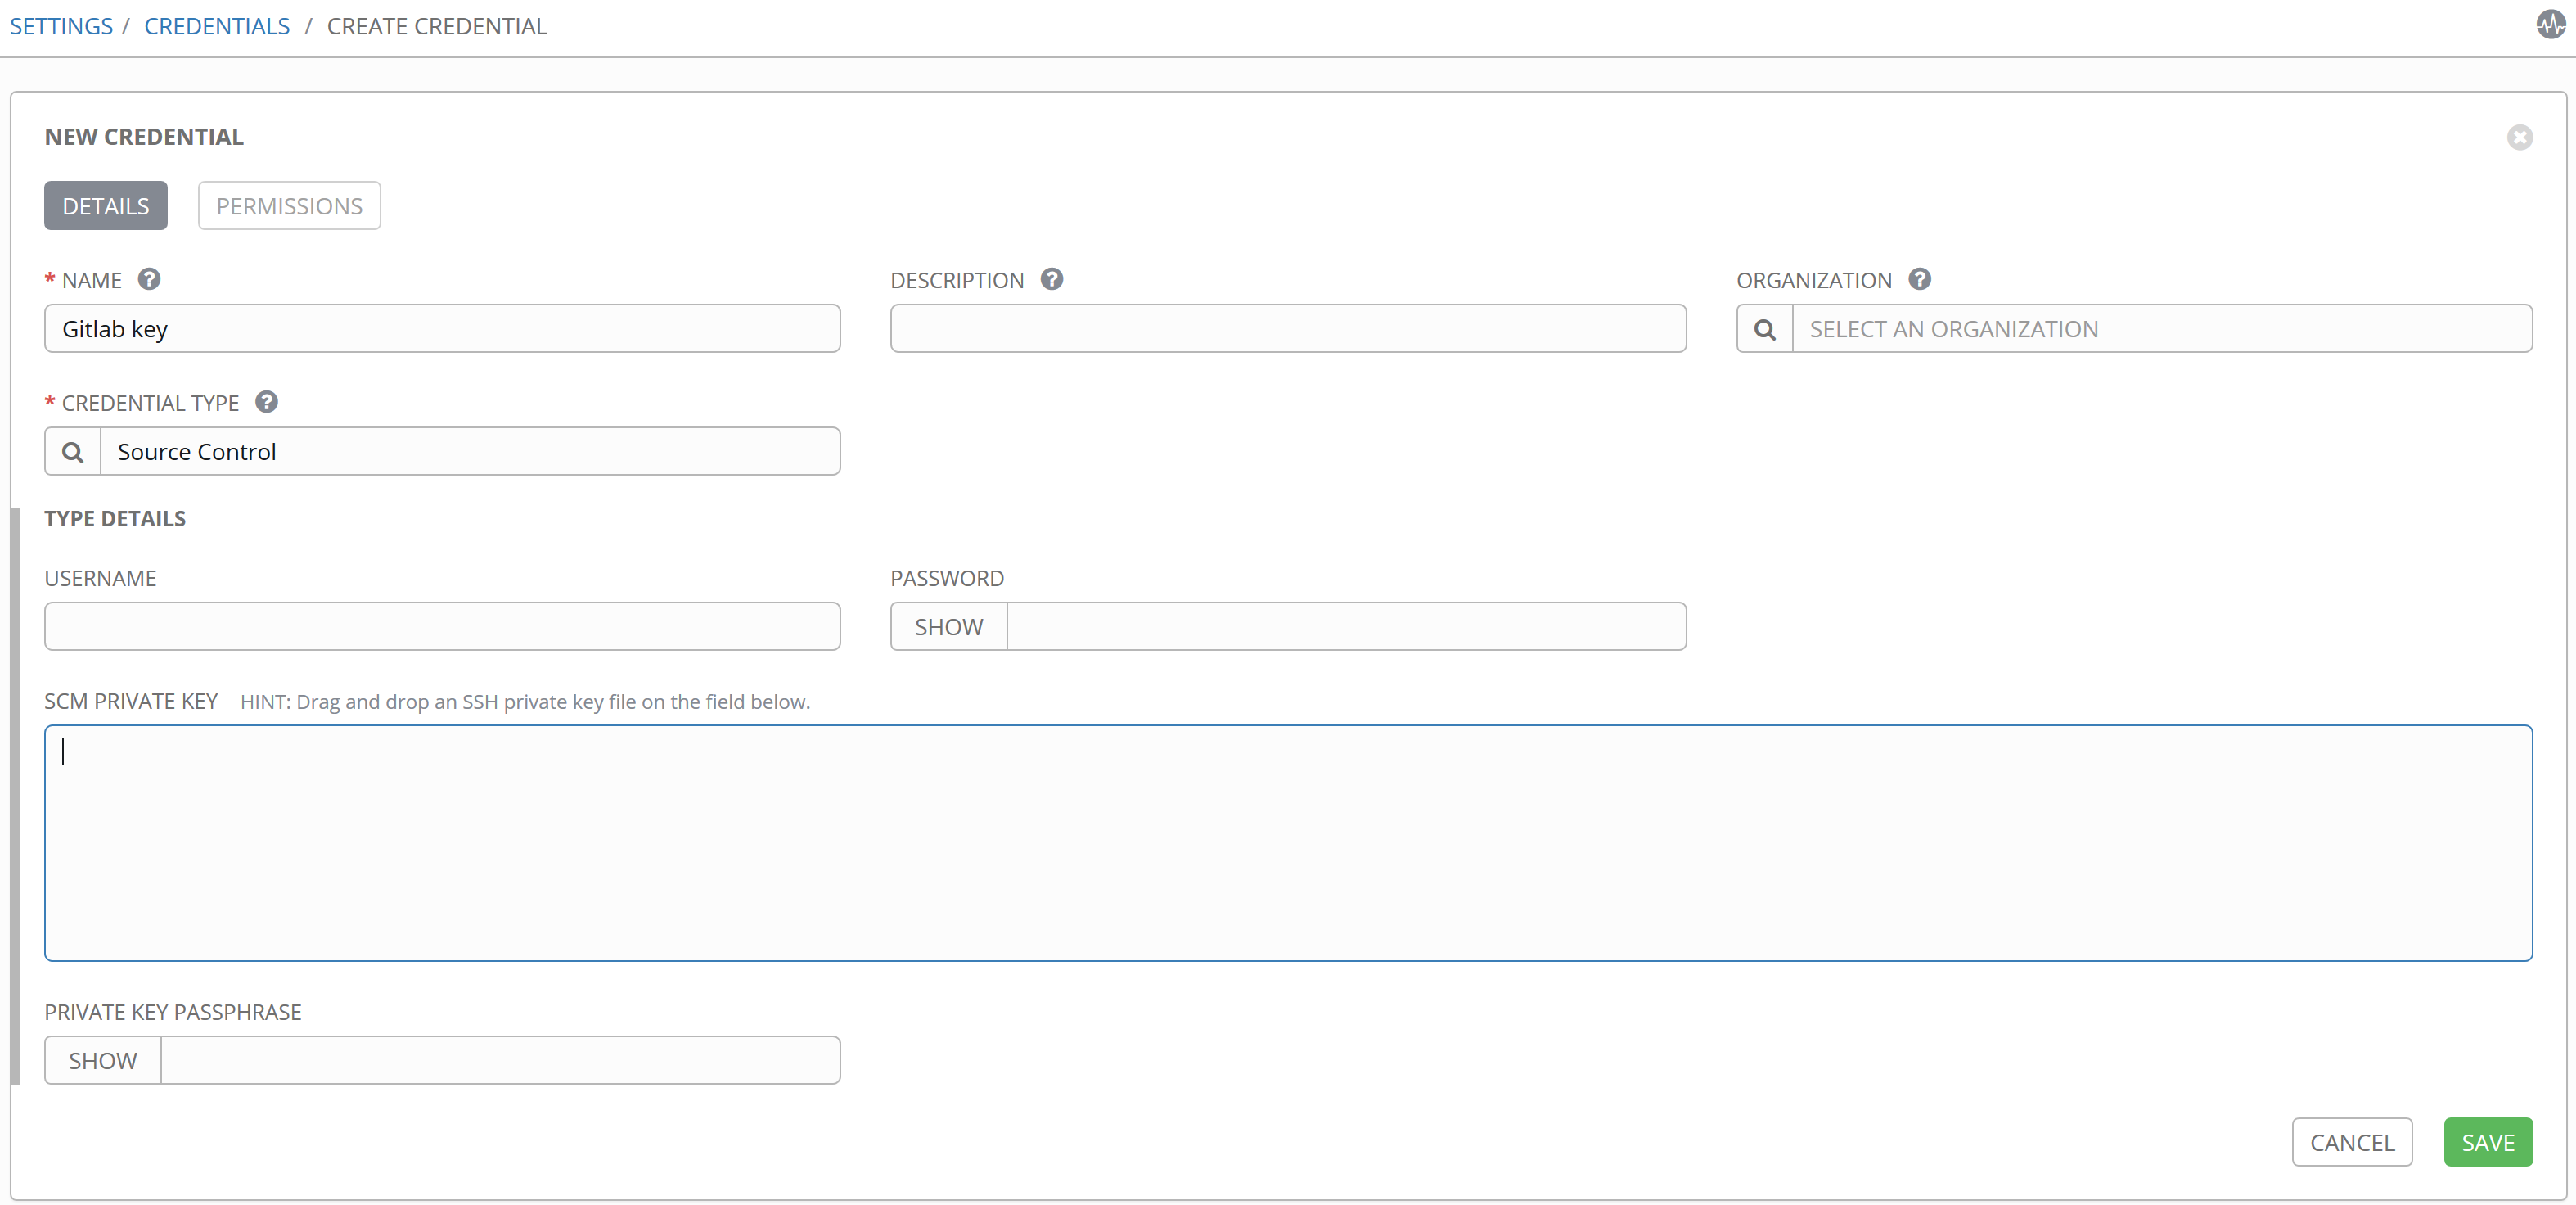
- SCM Private Key: If GitLab is using SSH Key authentication (PREFFERED) paste the private key to the public key stored in GitLab under User Settings -> SSH Keys. Paste under
- Name: Giv it a name.
- Credential Type: “Source Control”
- All other can be blank. Save.
In Ansible Tower go to Projects -> Add
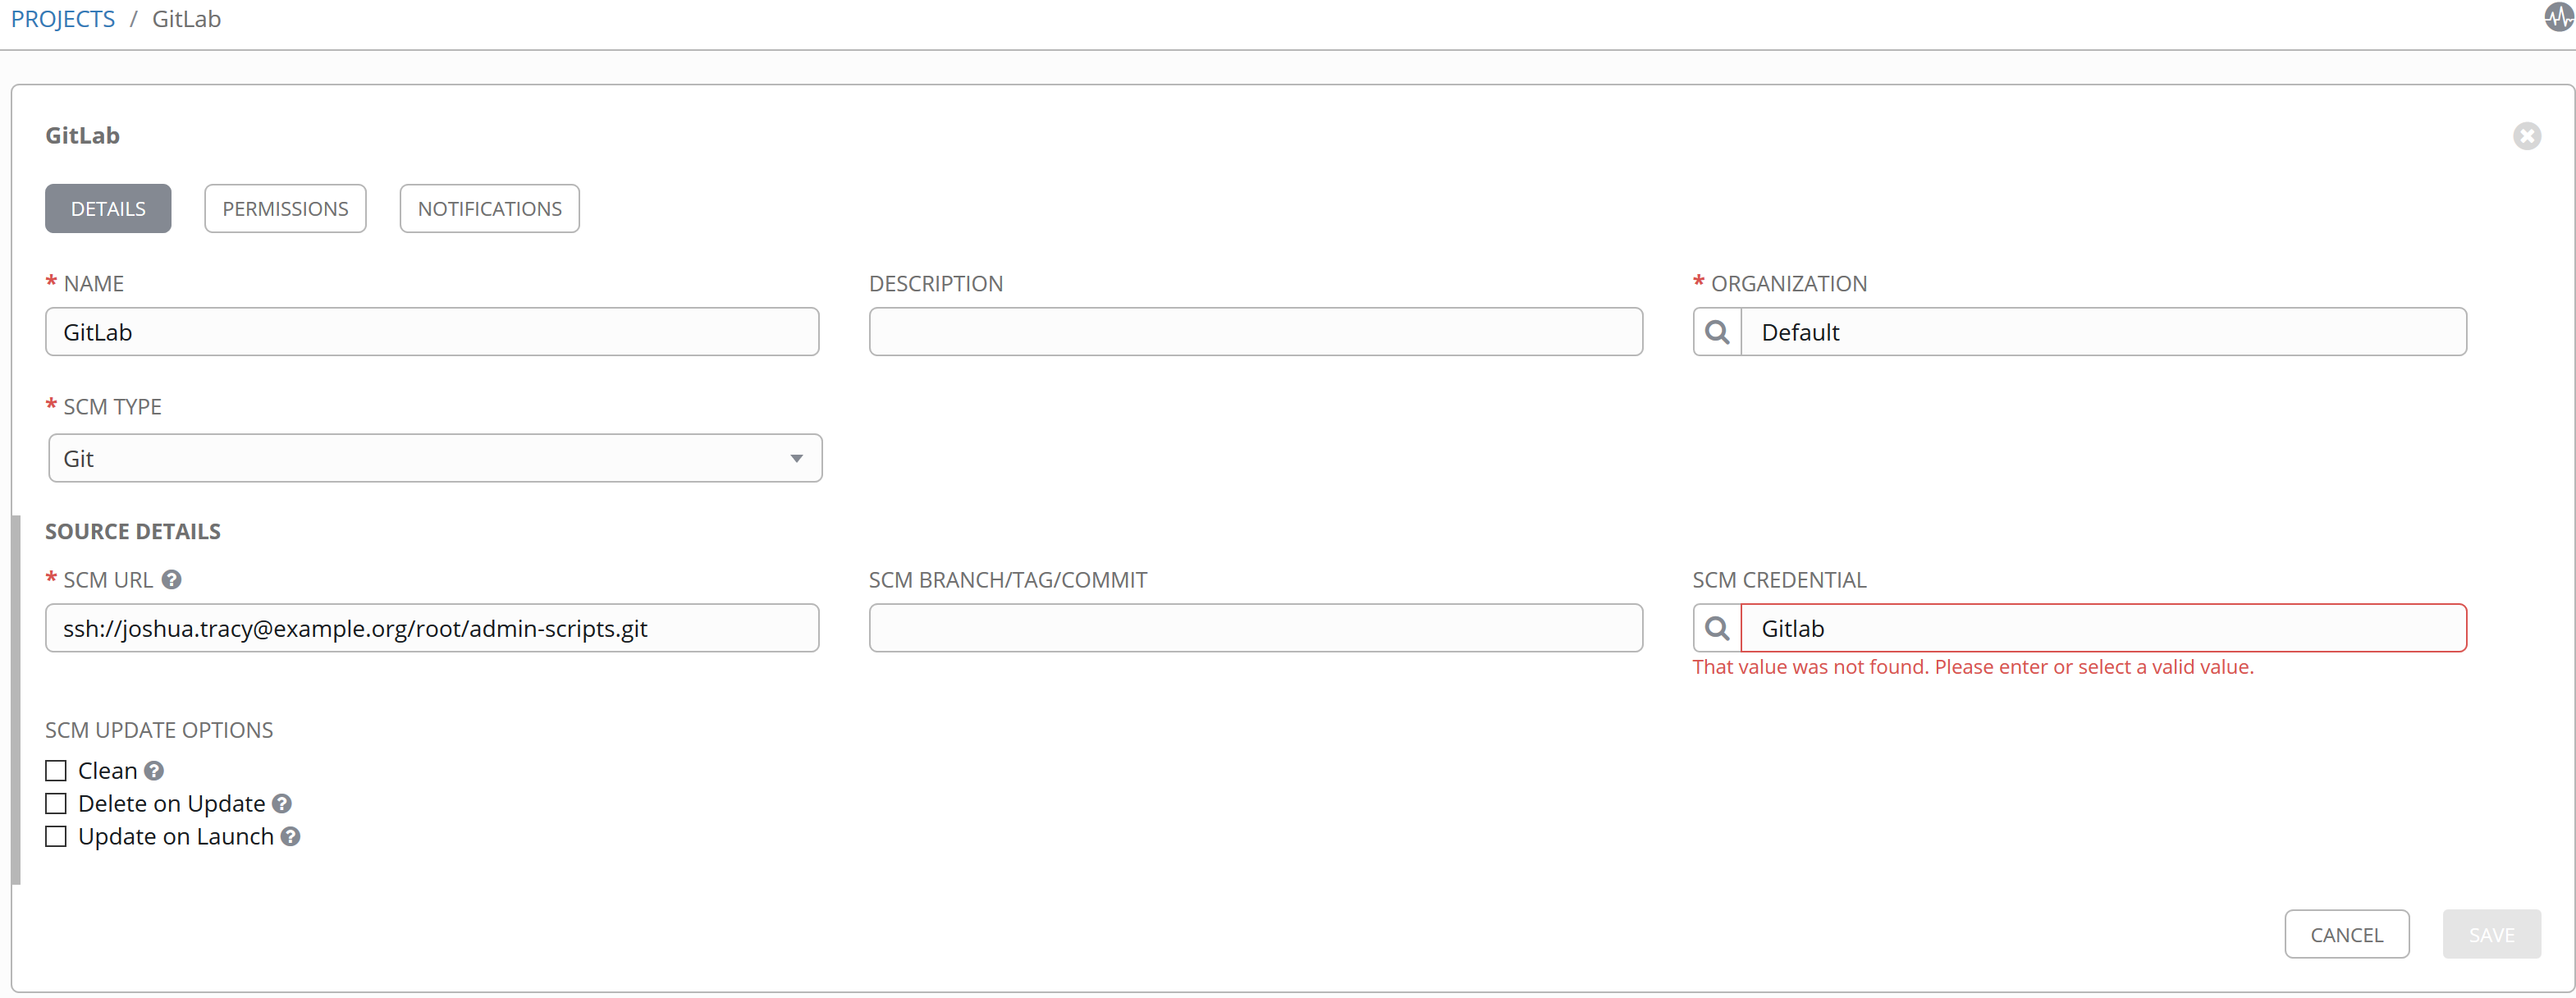
- Name: Pick one
- Organization: Pick one
- SCM Type: GIT
- SCM Credential: The one you just made
- SCM URL: The URL of the repo you will clone from. If HTTPS:// is not an option or doesnt work, use SSH://<”user@repo”> like in the picture above.
- Save
Errors
“The Peers certificate issuer could not be recognized”
SSL Is not configured on GitLab. If GitLab is using a self signed cert:
- Copy the self signed cert from GitLab to:
- /etc/pki/ca-trust/source/anchors/
- run: update-ca-trust extract
Quay
S3 Registry Settings
- Storage engine: Amazon S3
- S3 Bucket: Bucket name
- Storage Directory: /datastorage/registry
- AWS Access key: Add your key
- AWS Secret Key: Add your Key
- S3 Host (Optional): s3.your_region.amazonaws.com
SSO Config for Quay
Place the following in /quay/config/config.yaml
SSO_LOGIN_CONFIG: {CLIENT_ID: quay, CLIENT_SECRET: xxxxxxxxxxxxxxxxxxxxxxxxxxxxx,
  OIDC_SERVER: 'https://URL_OF_SSO_Server/auth/realms/REALMNAME/', SERVICE_NAME: SSO}
Also add the CA bundle to a directory called /data/quay/config/extra_ca_certs on the quay host and reboot the container.
S3 Policy for allowing Quay Registry access
{
"Version": "2012-10-17",
"Statement": [
{
"Effect": "Allow",
"Principal": {
"AWS": "arn:aws:iam::AWS-account-ID:root"
},
"Action": [
"s3:ListBucket",
"s3:GetBucketLocation",
"s3:ListBucketMultipartUploads",
"s3:PutBucketCORS"
],
"Resource": "arn:aws:s3:::bucket-name"
},
{
"Effect": "Allow",
"Principal": {
"AWS": "arn:aws:iam::AWS-account-ID:root"
},
"Action": [
"s3:PutObject",
"s3:GetObject",
"s3:DeleteObject",
"s3:ListMultipartUploadParts",
"s3:AbortMultipartUpload"
],
"Resource": "arn:aws:s3:::bucket-name/*"
}
]
}